Version v0.33 of Metabase is no longer supported. Check out the docs for the current stable version, Metabase v0.63.
The open source edition of Metabase includes the option to set up SSO with Google Sign-in or LDAP, but the Enterprise edition of Metabase additionally lets you connect your SAML- or JWT-based SSO. Integrating your SSO with Metabase allows you to:
There are slightly different steps to take depending on whether your SSO solution uses SAML or JWT. We’ll cover SAML first.
Tip! Before beginning your SAML set-up, make sure you know the password for your admin account. If anything becomes misconfigured during the set-up process, an “Admin backup login” option on the sign-in screen is available.
Before you get started, you’ll need to make sure things are configured correctly with your SAML provider. Each provider handles this differently, so here are some links that may help:
Click here if you use OneLogin!
Once you’ve configured your SAML provider, leave it open - we’re going to need some information for the next step.
Head over to the Settings section of the Admin Panel, then click on the Authentication tab. Click the Configure button in the SAML section of the Authentication page, and you’ll see this form:
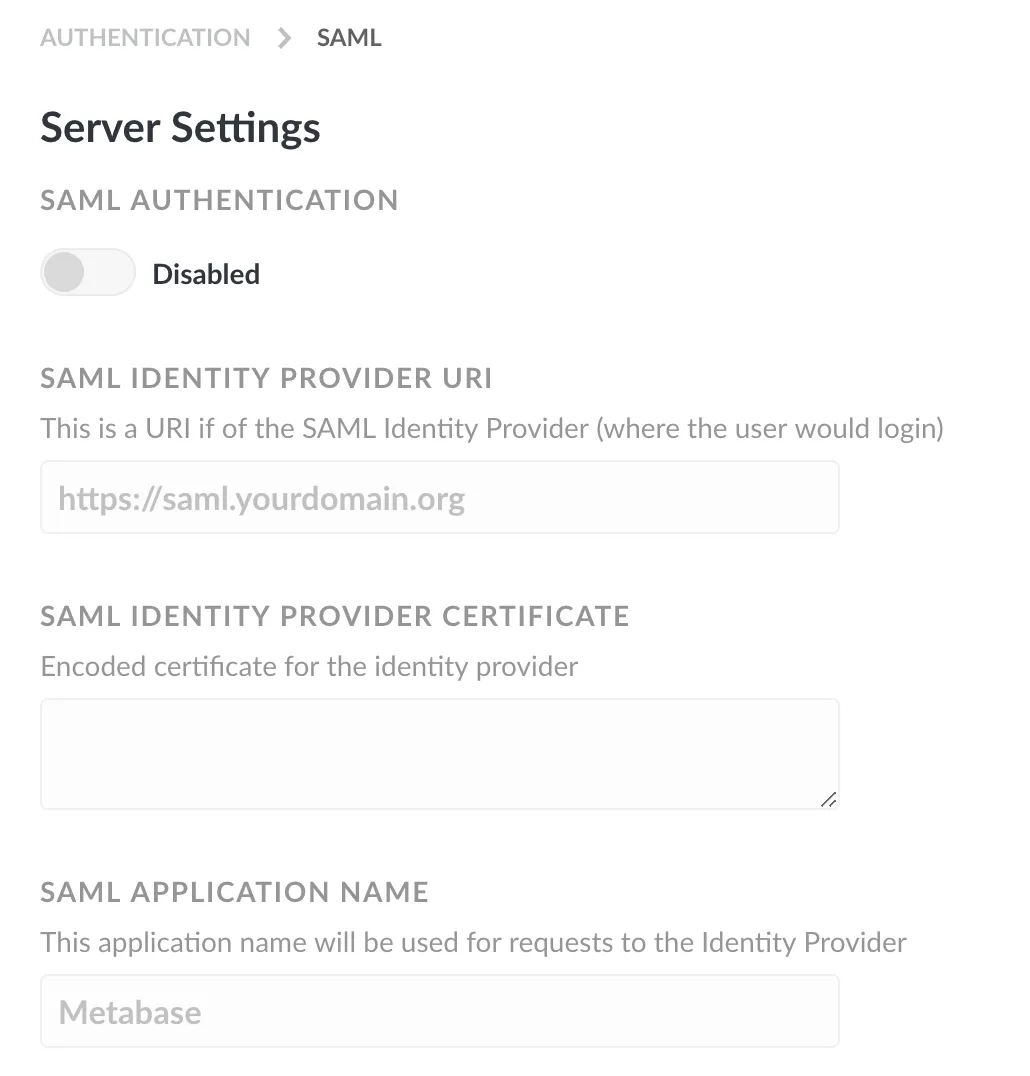
Click the toggle at the top of the form to enable SAML authentication, then fill in the form with the information about your identity provider. Make sure to turn this on, otherwise SAML-based authentication won’t work, even if all of your settings are right.
Here’s a breakdown of each of the settings:
Identity Provider (IDP) URI: This is where Metabase will redirect login requests. That is, it’s where your users go to log in to your SSO. Your SAML provider may label it a little differently. Here are some of the names we’ve found:
| Provider | Name |
|---|---|
| Auth0 | Identity Provider Login URL |
| Okta | Identity Provider Single-Sign On URL |
| OneLogin | Issuer URL |
Identity Provider Certificate: This is an encoded certificate that we will use when connecting to the IDP provider URI. This will look like a big blob of text that you’ll want to copy and paste carefully — the spacing is important! Again, different providers may have slightly different labels:
| Provider | Name |
|---|---|
| Auth0 | Signing Certificate |
| Okta | X.509 Certificate |
| OneLogin | X.509 Certificate |
Metabase will automatically log in Users authenticated with your SAML identity provider, but in order to do so the SAML assertion must contain attributes for each User’s first name, last name, and email. The assertion should look something like the following:
<saml2:Assertion
    xmlns:saml2="urn:oasis:names:tc:SAML:2.0:assertion" ID="id4170618837332381492734749" IssueInstant="2019-03-27T17:56:11.067Z" Version="2.0">
    <saml2:Issuer Format="urn:oasis:names:tc:SAML:2.0:nameid-format:entity">http://www.okta.com/Issuer</saml2:Issuer>
    <saml2:Subject>
        <saml2:NameID Format="urn:oasis:names:tc:SAML:1.1:nameid-format:emailAddress">userName</saml2:NameID>
        <saml2:SubjectConfirmation Method="urn:oasis:names:tc:SAML:2.0:cm:bearer">
            <saml2:SubjectConfirmationData NotOnOrAfter="2019-03-27T18:01:11.246Z" Recipient="https://metabase.mycompany.com/auth/sso"/>
        </saml2:SubjectConfirmation>
    </saml2:Subject>
    <saml2:Conditions NotBefore="2019-03-27T17:51:11.246Z" NotOnOrAfter="2019-03-27T18:01:11.246Z">
        <saml2:AudienceRestriction>
            <saml2:Audience>my-metabase-app</saml2:Audience>
        </saml2:AudienceRestriction>
    </saml2:Conditions>
    <saml2:AuthnStatement AuthnInstant="2019-03-27T17:56:11.067Z">
        <saml2:AuthnContext>
            <saml2:AuthnContextClassRef>urn:oasis:names:tc:SAML:2.0:ac:classes:PasswordProtectedTransport</saml2:AuthnContextClassRef>
        </saml2:AuthnContext>
    </saml2:AuthnStatement>
    <saml2:AttributeStatement>
        <saml2:Attribute Name="http://schemas.xmlsoap.org/ws/2005/05/identity/claims/givenname" NameFormat="urn:oasis:names:tc:SAML:2.0:attrname-format:uri">
            <saml2:AttributeValue xmlns:xs="http://www.w3.org/2001/XMLSchema" xmlns:xsi="http://www.w3.org/2001/XMLSchema-instance" xsi:type="xs:string">
              Cam
            </saml2:AttributeValue>
        </saml2:Attribute>
        <saml2:Attribute Name="http://schemas.xmlsoap.org/ws/2005/05/identity/claims/surname" NameFormat="urn:oasis:names:tc:SAML:2.0:attrname-format:uri">
            <saml2:AttributeValue xmlns:xs="http://www.w3.org/2001/XMLSchema" xmlns:xsi="http://www.w3.org/2001/XMLSchema-instance" xsi:type="xs:string">
              Saul
            </saml2:AttributeValue>
        </saml2:Attribute>
        <saml2:Attribute Name="http://schemas.xmlsoap.org/ws/2005/05/identity/claims/emailaddress" NameFormat="urn:oasis:names:tc:SAML:2.0:attrname-format:uri">
            <saml2:AttributeValue xmlns:xs="http://www.w3.org/2001/XMLSchema" xmlns:xsi="http://www.w3.org/2001/XMLSchema-instance" xsi:type="xs:string">
              cam@metabse.com
            </saml2:AttributeValue>
        </saml2:Attribute>
    </saml2:AttributeStatement>
</saml2:Assertion>
Most SAML identity providers we’ve used already include these
assertions by default, but some (such as Okta) must be configured to
include them. Here’s an example of what your assertions configuration
should look like in Okta. (You can find this page by going to Admin > Applications > Metabase > General > SAML Settings [Edit]).
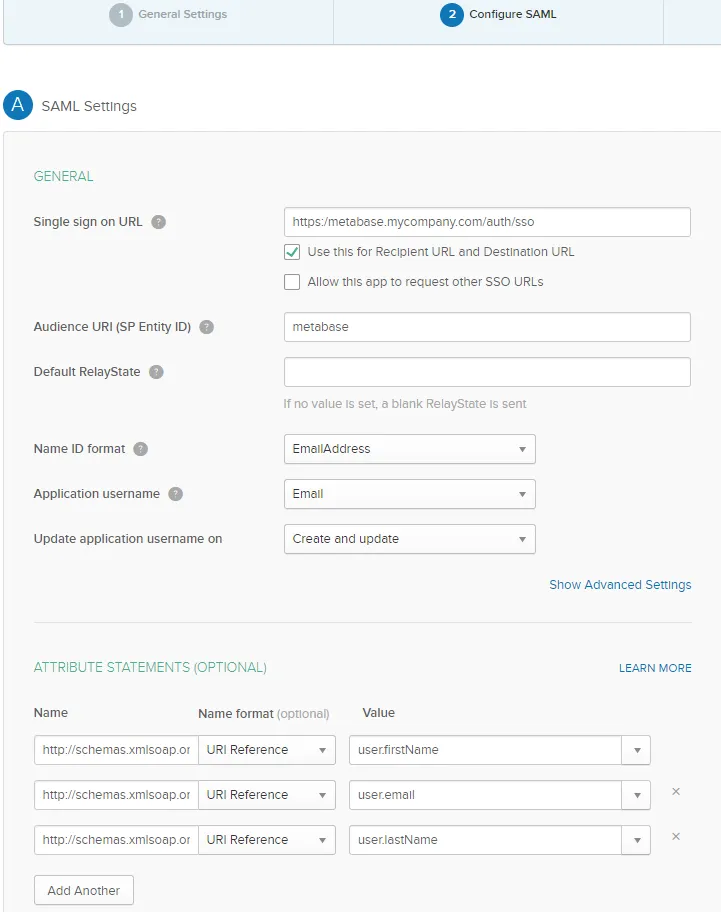
You can use other attribute names for these attributes if so desired; see the section below. The important thing is that first name (given name), last name (surname), and email address are included as attributes of the first assertion returned in the identity provider’s SAML response.
We’ve pulled the attributes out of the XML above for easy copy/pasting into your SAML identity provider. We’ve found that generally, you need to paste this into a field labelled “Name” but the location of the field may vary depending on the provider. Look for it in a section labelled “Attributes” or “Parameters.”
| Name | Value |
|---|---|
http://schemas.xmlsoap.org/ws/2005/05/identity/claims/givenname |
user.firstName |
http://schemas.xmlsoap.org/ws/2005/05/identity/claims/emailaddress |
user.email |
http://schemas.xmlsoap.org/ws/2005/05/identity/claims/surname |
user.lastName |
The email address attribute is used to log in an end user into a corresponding Metabase account (creating it if needed). Thus it is extremely critical that this email address MUST NOT be editable by end users themselves. Otherwise they could potentially access Metabase accounts other than their own by changing their email address.
These are additional settings you can fill in to sign SSO requests to ensure they don’t get tampered with.
SAML keystore path: the absolute path to the keystore file to use for signing SAML requests.
SAML keystore password: if it wasn’t already self-evident, this is just the password for opening the keystore.
SAML keystore alias: the alias for the key that Metabase should use for signing SAML requests.
These settings allow Metabase to automatically get each user’s email address and first and last name.
The settings that Metabase defaults to here might work for you out of the box, but you can override them if you know that your settings are different.
Each of these input boxes needs a URI that points to the location of a SAML attribute.
The group schema setting allows you to set Metabase groups based on an attribute of your user in your SAML provider. Please note that this may not correlate to group functionality provided by your SAML provider - you may need to create a separate attribute on your users to set their Metabse group, like metabaseGroups.
First, you will need to create a user attribute that you will use to indicate which Metabase groups the user should be a part of. Different SAML providers have different ways of handling this, but you will likely need to edit your user profiles. For the rest of this example, let’s say that you named your attribute metabaseGroups.
Once you’ve created your metabaseGroups attribute, you will need to update it for each user you would like to be automatically added to a Metabase group. For ease of use, we recommend using the same name for the groups you would use in Metabase.
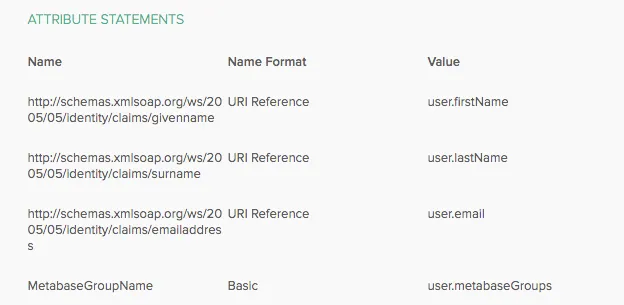
After that, you will need to add an additional SAML attribute to the ones we added above. The screenshot below is for Okta, but may vary dependng on your SAML provider.
Once you’ve gotten everything set up in your SAML provider, it’s just a few simple steps on the Metabase side!
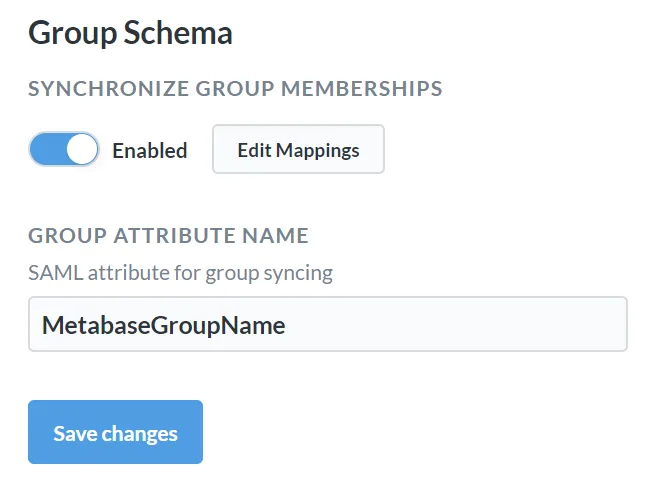
To start, make sure the toggle is set to “Enabled.” Then, click Edit Mappings -> Create a Mapping. This will allow you to enter the group name(s) you entered as your metabaseGroup attribute values and the Metabase group it should correlate to.
After that, add the name of the user attribute you added in your SAML provider. In this case, we told Okta that the metabaseGroups attribute should be named MetabaseGroupName, so that’s what we’ll enter in the Group Attribute Name field in Metabase.
Here are a few things to double check if you’re experiencing issues setting up your SAML connection:
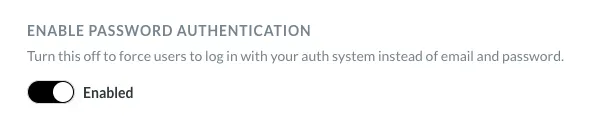
https://metabase.mycompany.com, the full url should be https://metabase.mycompany.com/auth/ssoOnce you have configured your SAML authentication, you can choose to disable the option for users to log in via username and password. To do this, return to the main Authentication settings page and scroll to the bottom. A toggle will now be visible allowing you to make this change.
If SAML isn’t your bag, find out how to enable JWT-based SSO.


